
Smartsystem Arm x1 Deep Dive & Tuning Tips
First published Feb 7, 2024, last updated Mar 29, 2024
After owning the Smartsystem Arm X1 for a few months and not being able to consistently tune it to produce the results I wanted, I bit the bullet and spent time systematically testing combinations of X Tune settings, spring arrangements, and payloads. My main takeaways were that the X-Tune’s relationship to behavior (sort of “isoelasticity”) is a bell curve, the arm performs best when the springs are closer to fully loaded, and lighter loads tend to require a higher minimum X-Tune adjustment.
The rest of this write up consists of my understanding of the arm and personal recommendations for properly adjusting it, along with an in-depth discussion of how adjustments effect performance, my understanding of how the X-Tune mechanism works, my approach to setting up the Arm X1, general tips for using the arm, and a more detailed description of my testing methodology and results.
Since publishing the first draft of this in February 2024, I’ve taken into account my own experience, feedback from other operators and information directly from the designer of the Smartsystem Arm X1, Andrea Falcucci. While I’m very open to incorporating experiences and information that comes from these sources, this write up is ultimately based on what I find to be true and work for me.
Let’s define a few terms before we dive into this:
Payload is the total amount of weight supported at the end of the arm.
Preload is the adjustment for how much payload the arm will support. It’s similar to the “lift” adjustment on Tiffen arms. Since springs in the Arm X1 are at their longest or fully expanded at rest, increasing the preload squeezes them closed, compressing them. Relative to the mechanism in use, this adjustment is referred to as the preload. The more preload applied to a spring, the higher the arm will lift a given payload. In the context of this discussion, there is one correct preload setting for a given payload and spring arrangement.
Isoelasticity is a very common word in our Steadicam community, and it refers to how much force is required to boom the arm, up or down, away from the midpoint of the boom range. An isoelastic arm will let you boom through a larger range while feeling little resistance or feel more “buttery smooth,” and a non-isoelastic arm will tend to return to center, or feel more “springy.” The range of different isoelastic settings are subjective and can differ between operators and situations.
The designer of the Arm X1 does not consider this arm to be isoelastic. While I agree that this arm’s design and performance is different from Tiffen’s very isoelastic designs, I still find isoelasticity to be a useful description of the Arm X1’s performance and behavior. The official description of the X Tune is a “force multiplier,” which is described as chaning how aggressively the springs react. At low X Tune settings, the springs act less aggressively, and at a higher X Tune setting the springs act more aggressively.
Behavior is a term I’m using to describe how the arm acts, separate from preload or isoelasticity. As opposed to isoelasticity, which has a range of different but acceptable effects, the arm’s “behavior” is an objective difference between a functional and non-functional arm (in the context of this discussion). A properly behaving arm will have smooth and consistent resistance through its boom range, isolate the sled from the operator’s movements, and generally act the way operators expect an arm to. An incorrectly behaving arm will tend to pop between the extremes of its boom range, will not isolate the sled from the operator’s movements, and produce bumpy motion at the camera end of the arm.
Spring arrangement is a description of which springs are installed into which arm bones. For example, one arrangement could be four blue springs, one in each of the four arm bones. Another arrangement could be two black springs, one in the lower arm bone of each arm section.
(Overview of the arm: The Smartsystem Arm X1 has two arm sections (upper arm and “forearm”), each of which have two identical “arm bones” (making four total). Each arm bone can carry one spring. There are two spring strengths, blue and black. The arm can take combinations of springs, either with one spring per section or two. Typically, each section will have the same spring arrangement as the other, but not always.)
The Bell Curve (or; How I Learned to Stop Struggling and Adjust My Arm)
My first key discovery in this investigation was how the X-Tune adjustment effects isoelasticity. After preload is set for a given payload and spring arrangement, X Tune can be dialed in. The X Tune gauge reads MIN at one end and MAX at the other. I had initially assumed that setting the X Tune fully to MIN would result in the most isoelastic performance of the arm, with an even and predictable change towards being less isoelastic as it was adjusted towards the MAX.
This is not the case. The relationship of the setting on the X Tune from MIN (“0”) to MAX (“12”) follows a bell curve rather than a more linear line. This means that the most isoelastic point in the range of MIN to MAX (or “0 to 12” notches on the arm’s spring compression gauge) might not be at 0, but somewhere further down the range. In this situation, I refer to the range before this newly set point “before the peak.” This peak, or point of most isoelasticity (OR smoothest booming characteristic OR least aggressive spring characteristics), changes based on payload and spring arrangement. It is not a set point but one that changes relative to how the arm is set up and adjusted.
For example, in a given payload and spring combination, the most isoelastic X Tune setting is 3 notches above MIN (0). So, any X Tune setting between 0 and 3 would be “before the peak” which is effectively unusable behavior, an X Tune setting of 3 would be “at the peak” which is the most isoelastic setting, and an X Tune setting of 12 would be the least isoelastic setting. Again, this is relative to a given payload and spring arrangement combination and will be different for different set ups.
The below graph shows the general relationship of the X Tune adjustment and the isoelasticity of the arm. The blue dashed vertical line shows the “peak” where the arm will be the most isoelastic. The dashed red area on the left of the graph shows the area “before the peak” which should be avoided. Again, the exact position of the peak and curvature of the line are different for different payloads and spring arrangements.

There are a few takeaways from this. First, when the X Tune is set to a point before the peak, the arm does not “behave” correctly. It does not tend to boom evenly through its range and will tend to snap from the bottom of its range to the top over a very short range. Footsteps will not be isolated well, and in every way that matters, the arm won’t be doing what you want it to. I think of this range as effectively unusable or “out of bounds.”
Second, it’s easy to see and feel this behavior and incorrectly assume that your arm is not adjusted to be as isoelastic as you want. But, when you decrease the X Tune (say from 3 to 1, or even 0) the arm still behaves incorrectly and feels “springy,” which is associated with a non-isoelastic arm.
Third, even if you can find a spot before the peak where your arm behaves well, the range before the peaks is always shorter than the range after the peak. This means adjustments will need to be extremely fine to adequately dial in your preference. In my testing, I’ve found no reasons to attempt to tune the arm before the peak of the curve.
So, knowing about the bell curve is handy because it helps you diagnose whether a behavior is either out of bounds (before the curve) or non-isoelastic.
How the X Tune mechanism works (with graphs!)
The X Tune mechanism changes the rate of compression in the spring over the course of its travel. Effectively, the X Tune mechanism creates a triangle. The two corners at opposite ends of the longest side of the triangle are the spring and the chassis. The third corner of the triangle is the X Tune corner. Adjusting the X Tune will change the angle of this corner of the triangle. Adjusting X Tune closer to MAX (+) will make the corner flatter, and adjusting X Tune closer to MIN (-) will make the corner steeper.
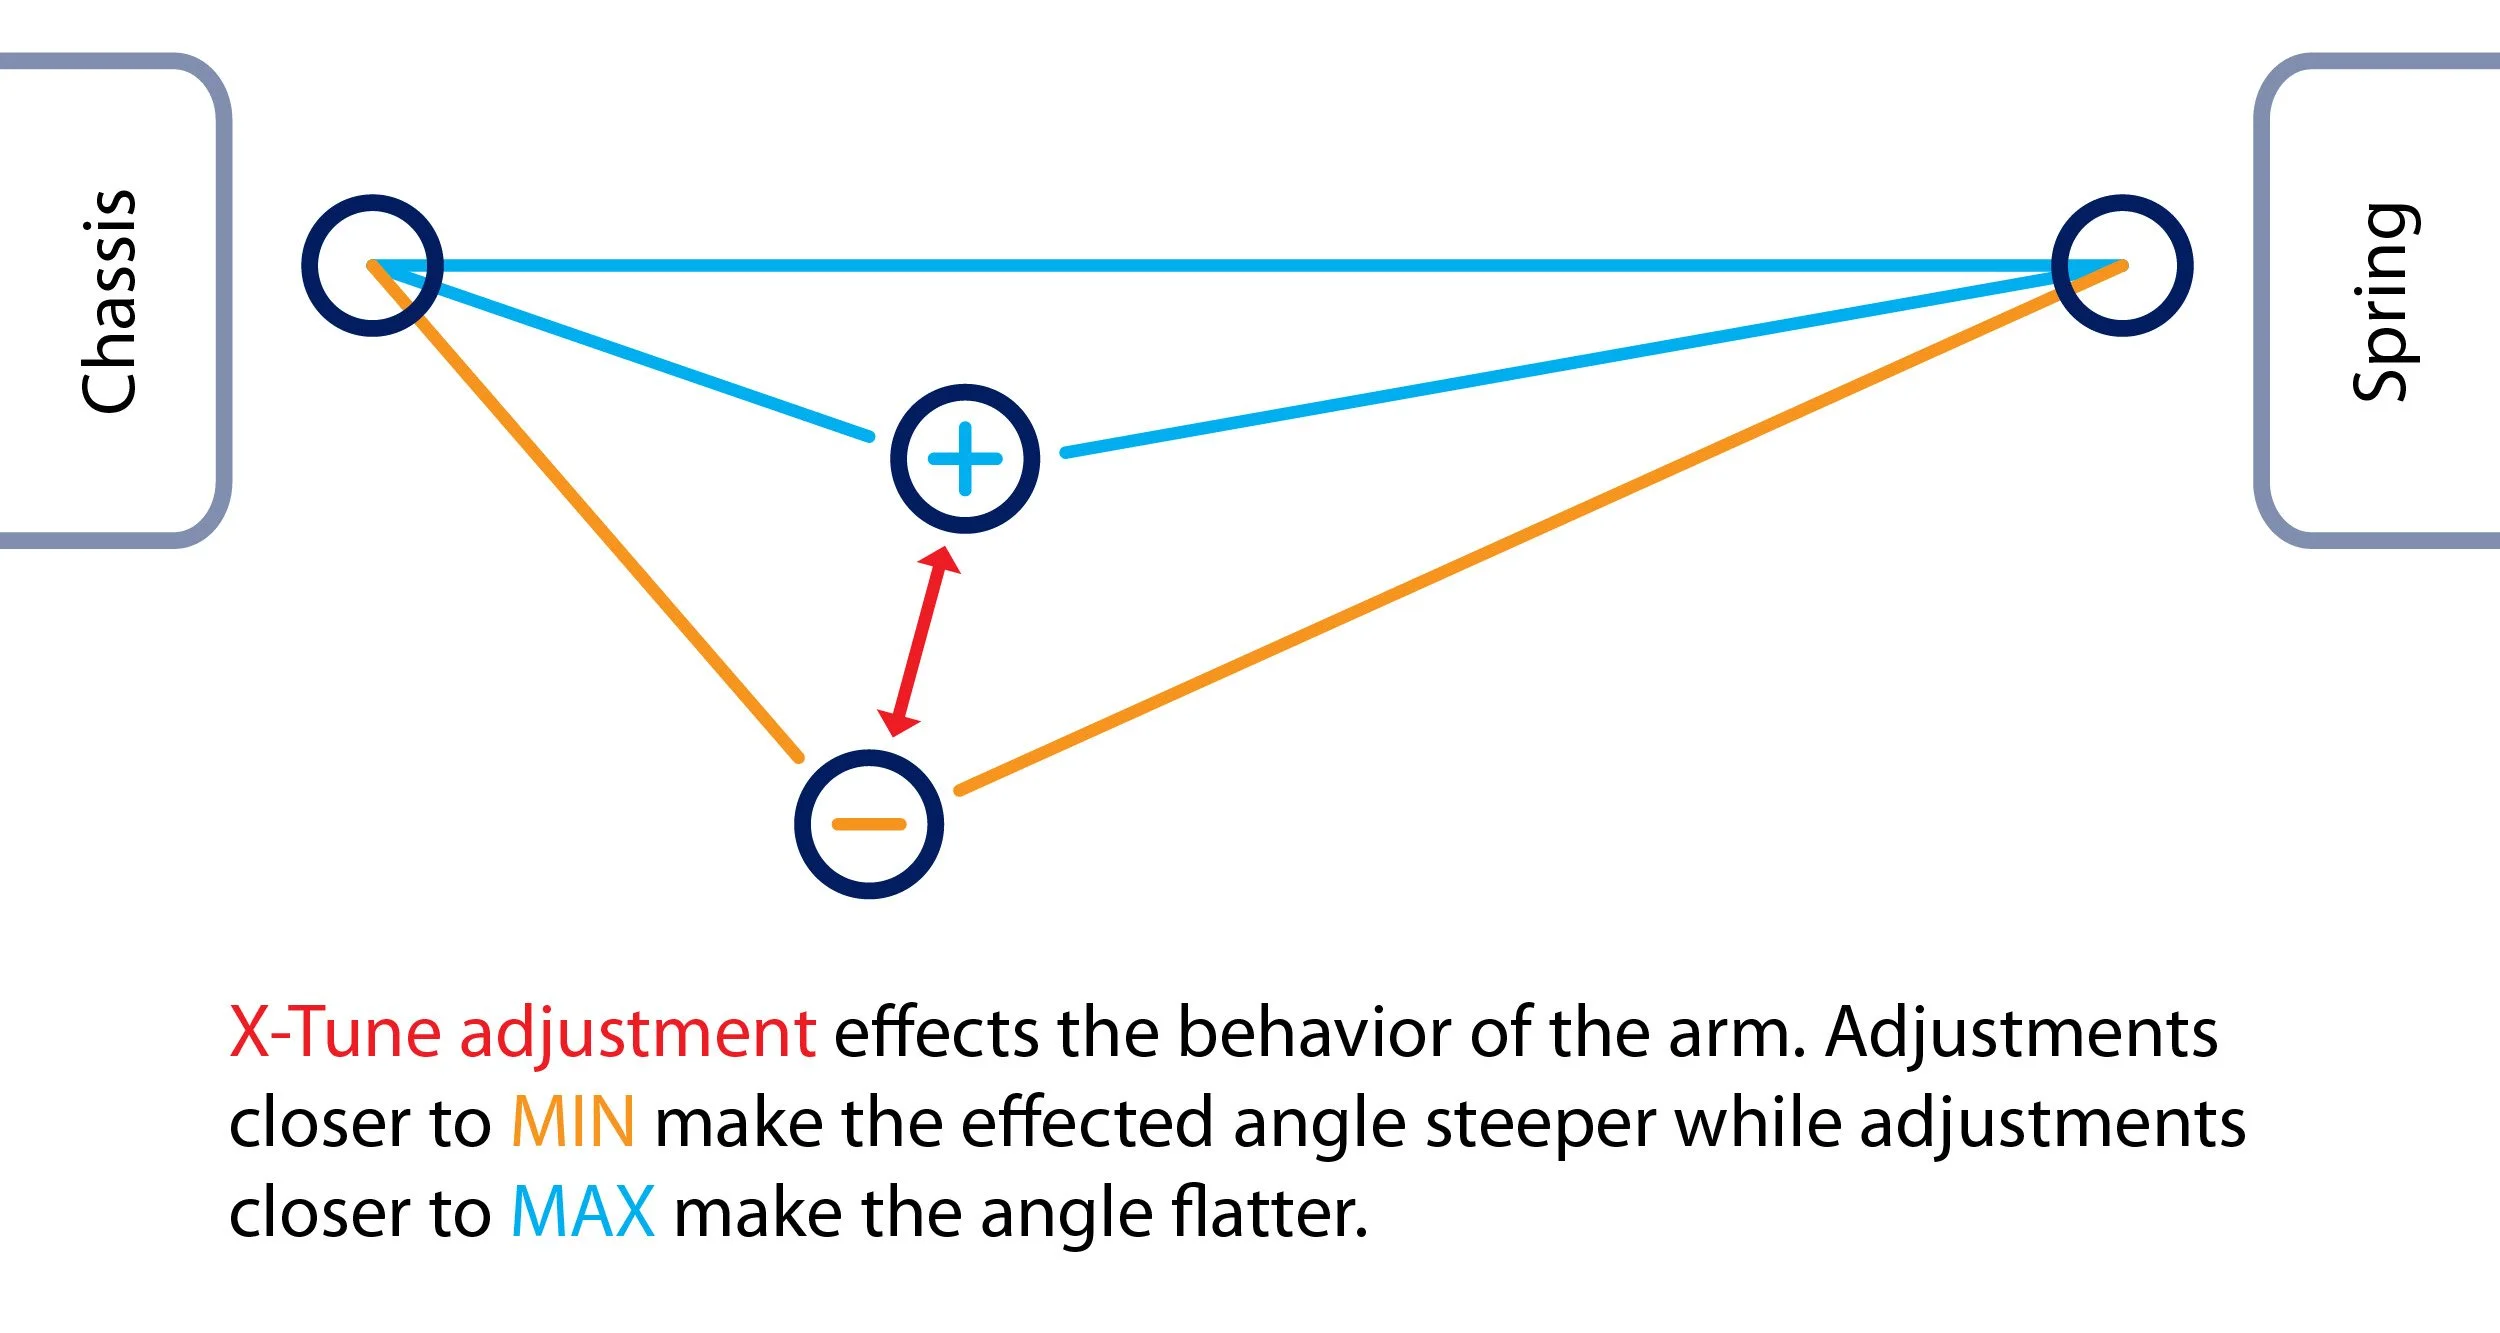
This adjustment creates a change in the way the spring compresses through its range. When the X Tune is set towards MAX (+) and the triangle is at its flattest, this causes the spring to move linearly (in a straight line). This is most like an “uncorrected” (or uncompensated, unadjusted, etc.) spring and will behave in a non-isoelastic way. To reiterate, an “uncorrected” spring will behave in a non-isoelastic way, which is when the X Tune is adjusted towards MAX (12). Relative to Smartsystem’s descriptions, an X Tune setting adjusted towards MAX will cause the springs to behave more aggressively. They will tend to keep the arm at the center of its boom range, and could be described as feeling “springy.” This is different from an X Tune that is set before the peak, but will in some ways feel similar.
When the X Tune is set towards MIN (-) and the triangle is at its steepest, this causes the spring to move in a non-linear way (represented by a curve on the graph below). This is a “corrected” spring and will behave in a more isoelastic way. Relative to Smartsystem’s descriptions, an X Tune setting adjusted towards MIN will cause the springs to behave less aggressively. The amount of force to boom will feel more equal through the range, and the arm will not tend to return to center as strongly.

This explanation for why and how this works to produce isoelastic behavior is beyond this discussion, but the quick and dirty version is that the non-linear compression of the spring through its range effectively makes it so that the tension on the spring is equal at any given point in the travel. (I’ll link to other sources that go into more detail on this in the future, this is not a concept I discovered.)
Okay, I’ve seen the graphs, how does this help me?
Well, now when you set up your Arm X1 you won’t be in the dark, trying settings at random. There are up to four preload adjustments and four X Tune adjustments, nine spring arrangements, and an infinite amount of payload iterations, all of which add up to a disorienting number of variables. Now you know about the potential false positives that being before the peak can cause.
My approach for setting up an arm with an isoelastic X Tune is to start around 3 full marks above MIN on the X Tune gauge. Then, after feeling the arm’s behavior and isoelasticity, I reduce X Tune by one mark, readjust preload to compensate, and feel again. If the arm feels good and more isoelastic, then you’re approaching the peak of the bell curve, or the relative minimum useful setting for that payload and spring combination. If the arm feels springier, or like it’s behaving worse, then you’ve passed the peak and are now “before the peak” in the no-go zone. Adjust accordingly. If I suspect I’m close to the peak, I may adjust the X Tune setting by a half notch.
Additionally, you can set the X Tune and behavior of the arm for different shooting scenarios. For typical operating, I prefer to use the lowest X Tune setting available, and I suspect most other operators will agree. A higher X Tune setting with a springier feel (or more aggressively acting springs), as suggested by Smartsystem is useful when hard mounted to a vehicle. During normal vest mounted operating, the socket block moves smoothly through space. On a vehicle, the socket block moves erratically through space, effected by the bouncing the vehicle. A higher X Tune and resulting more aggressive springs will help counteract this.
(I learned the difference the hard way. I set my arm up with a low X Tune mounted to the back of a golf cart driven on what I can only describe as a rallycross course. My sled hit the roof of the cart on the first lap and I spent too much energy fighting to keep the rig’s booming under control. If I had tuned the X Tune higher, the arm would’ve tended to keep the sled closer to the middle of the boom range, and I wouldn’t have had to fight as hard to keep my sled from hitting the roof or the ground.)
Other characteristics of X Tune and Arm X1 (“Tips and tricks”)
The concept of being “before the peak” is both the most important and most complicated thing I’ve learned about using X Tune correctly, but it’s not the only tip I’ve come up with. Here are a few others:
1. Lower payloads tend to require a higher minimum X Tune setting. A similar concept is discussed in the truly excellent Steadicam Operator’s Handbook with regards to lighter payloads and the “ride” adjustment on Tiffen arms. Keep this in mind with your builds, as an arm with four black springs at the end of its capacity may have a bell curve peak very close to 1 or 0.
2. Similarly, through my testing of payloads in the 30-35 pound range with overlapping spring arrangement options, I found that the arm can be more isoelastic with four springs rather than two. There are very few payloads that give you the option of choosing the number of springs to use, but it is good to keep in mind when comparing a build that uses two springs to one that uses four.
If your current spring arrangement isn’t able to be made as isoelastic as you need, it’s worth considering increasing the payload of your build to allow you to use a different spring arrangement. Just like a heavier sled has different inertial characteristics in terms of a pan and tilt, a heavier payload might allow you to use a spring arrangement that fits your preferences better.
3. That being said, the arm tends to behave its best and most isoelastic when the springs are closest to fully preloaded. For example, the same payload with two lower black springs at 90% preload will be able to be more isoelastic than the same payload with two upper black springs at 50% preload. However, not all springs arrangements can be preloaded as far as others! The marks on the preload gauge are useful to know where you have the preload set, but in some spring arrangements the arm will not behave correctly higher than 10 while others will happily perform at 12. In other words, different spring arrangements have different maximum preload settings. Watch for symptoms similar to having the X Tune before the curve, and if you can’t quite get the arm to behave well, try switching to the next highest spring arrangement.
With four springs installed, the arm tends to behave best when one spring in each arm section is close to fully preloaded.
4. Tuning the two arm sections to work together properly is essential. My preferred method for setting the preload of the two arm segments is to start by adjusting the preload of both segments so that the arm is parallel to the ground. Then, watching the arm during a controlled boom, tune the arm segments so that they reach the top and the bottom of the range unison. This is more important than the two arm sections being parallel with each other through the boom range.
X Tune is typically set identically between the two arm sections, and after using the above method, produce acceptable results. I experimented with adjusting the X Tune differently, based on the upper arm carrying the additional weight of the forearm. While I found that compensating with a very small amount of X Tune on the upper arm allowed the arm to both bottom/top out in unison and stay parallel at all points during the boom, my limited testing didn’t show a noticeable difference in performance.
5. One notch of X Tune adjustment requires approximately ¾ of a notch of preload adjustment in the corresponding direction to maintain the same amount of lift.
6. When installing or removing springs, I’ve found the most universally useful approach is to loosen all springs until the arm can lay straight, angled at the midpoint between full boomed up and fully boomed down. In this orientation, you should have the clearance to remove or replace springs in all of the arm bones.
7. Change your spring arrangement when the payload changes! I’ve helped a few ops diagnose a poorly behaving Arm X1 since I first published this, and most of the problems were caused by an over strong spring arrangement. I’ve heard of many operators loading four blue springs into the arm and never changing them, even with lighter payloads. I said it in tip #3, and I’ll say it again here: the arm performs best closer to fully compressed, and worst when it’s under compressed!
In my testing, I was rarely happy with the performance of the arm when the springs were set to less than 50% preload. If your springs are less than halfway compressed, there is another lighter spring arrangement that will carry your payload, and it’s almost guaranteed to perform better. It’s tedious to swap springs, but the more you do it, the quicker it’ll get, the better you’ll be at guessing the right arrangement, and the better your arm will perform.
Testing Methodology
Coming sooooon
Notes
If you have any feedback on this, please feel free to contact me. I’ll update this as my understanding changes.
I currently have not specifically credited any of the other operators I’ve talked with and learned from, but I do not what to come across as having done all of this on my own in a vacuum. I want this resource to be available because it’s the exact kind of thing I wish I had when I first bought this arm, much like the long list of similar things published by other Steadicam operators (Jerry Holway’s Dynamic Balance Primer, Chris Fawcett’s Steadicam Posture, Taj Teffaha’s video on tuning this same arm, and everything Garrett has ever written on the subject, to name a few.) Other operators I’ve met in person and online, Andrea, and others outside of the film industry have all helped me immensely in understanding this topic, and this write up would be much less thorough without their help.